Tempering Chocolate Shortcut Using Cocoa Butter


Did you know that the high quality chocolate blocks you buy at the grocery store are already tempered? The only reason we home cooks temper at home is because when we need to melt the chocolates to remold and work with them, we melt them at a high enough temperature to bring the chocolates out of temper. I’ve long since given up on the heating-cooling-reheating monitored with a candy thermometer process that’s taught to most home cooks. It’s time consuming and produces more dishes to clean. After many experimentation, here’s my simple three-step method:
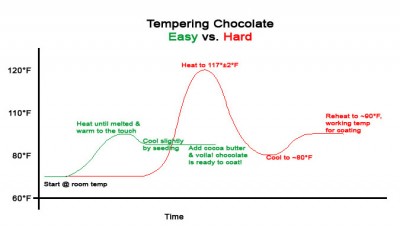
  • In a shallow, heatproof bowl (I use Corelle), initially melt about 3/4 of the chocolates (chips or chopped) in the microwave on high for just under a minute. Stir and reheat in bursts of about 20 seconds until all the chocolates have melted and is warm to the touch – just below your body temperature. You can use a candy thermometer but after many tries, you, too, will get a sense for what that temperature feels like. See the Callebaut site for detailed pictorial instructions.
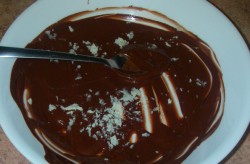
  • Seed the chocolate by adding the remaining 1/4 chocolates until melted. Heat for a few seconds in the microwave if needed. Tip: seed with high quality white chocolates, if available, as they generally contain a higher cocoa butter content and will ensure more beta crystals in your chocolate.
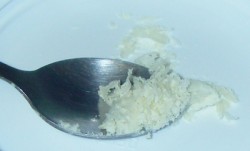
  • Add about 1% (by weight) of cocoa butter and stir until melted. I.e., for 10 oz of chocolates, add about 0.1 oz of cocoa butter. To understand how cocoa butter helps, refer to Tempering with Mycryo® at the Callebaut or Cacao Barry site. Many professionals use Mycryo® – it’s one of their best kept secrets for achieving consistently well-tempered chocolates with the sought-after sheen and snap. It is sold in chef supply stores and it’s expensive. Guess what it is? 100% cocoa butter! The only difference is that it’s been cryogenically processed into a convenient-to-use powder form. For chocolates, you don’t need the powder form. Cocoa butter is solid at room temperature. Simply scrape what you need with a spoon and you get shaved cocoa butter that easily dissolves into your melted chocolate.

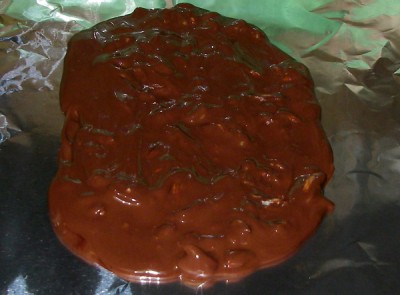
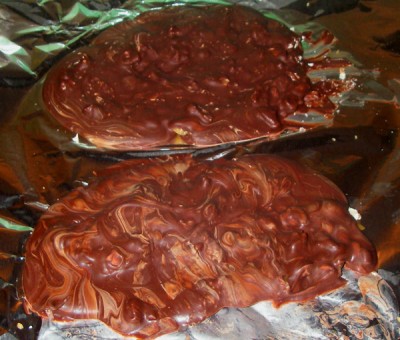
Below is a picture of two chocolate barks (with chopped nuts) made from the same batch. I poured out half the batch to make one bark (bottom), then added the cocoa butter to the remaining chocolate for the second bark (top). Ignoring the terrible picture, you can visually see the difference that adding cocoa butter significantly reduced the blooming effect.
Two more days until Valentine’s Day! Now that you know how to achieve tempered chocolates like the pros, surprise your loved one with homemade chocolate candy. I will be making a less sweet version of Hershey’s Symphony bar, my husband’s favorite.

Posted in recipes | Leave a comment

Happy Chinese New Year!

2011 - Year of the Rabbit

The 2011 Chinese New Year begins with blistery cold weather ( at least to us here in the south) and hopefully snow, an unusual treat for us Austinites. Here’s a fun indoor craft to do with your kids – mini lighted paper lantern:

  • Make an origami cube or ball out of a square piece of paper. Two links to well-illustrated instructions: How to Make an Origami Cube on eHow and Origami Ball on Hardin K-12.
  • Before ‘puffing’ out the ball, unfold one of the four flaps and put a glowstick, LED throwie, or in our case, an LED clip-on light inside the ball.

Here’s another fun thing to make on an indoor day – homemade fortune cookies.

Homemade Fortune Cookies

Posted in family cooking, kids craft | Leave a comment

Free Mulch in Austin!

Start thinking and planning for your Spring garden now! The free mulch from the Christmas tree recycling program is still available at Zilker park on the south side of Barton Springs Rd. It’s free for the taking which I confirmed with the Parks & Rec guys even though it wasn’t well publicized this year. As of Thursday, there was still a big heaping pile as seen in the picture and a smaller one to the side.

Posted in gardening | 1 Response

Local Austin Free Christmas Event This Saturday

This Saturday (TOMORROW), the Ultimate Mom’s Club of Austin is hosting an afternoon of festive fun for the whole family! There will be lots of arts and crafts, a visit from Santa, holiday shopping supporting local businesses, and more. And to raise funds for the Club, there will also be a raffle every 30 minutes. Enter for your chance to win some great stuff including our Wabi Sabi Baby waterproof diaper covers!

Posted in Wabi Sabi Baby News | 1 Response

End-of-Year Diaper Covers and Accessories ‘Surprise Me’ Sale!

This is our biggest sale of the year! Not picky on fabric prints? Good for you and save BIG! I choose the print and you get over 50% off on all diaper covers, travel changing pads, and wet bags. That’s all diapering items under $10!

All our durable diaper covers and accessories are made of two layers of fabric: a beautiful 100% cotton print on the outside and a flexi waterproof layer on the inside.


Click to here to start shopping!


Sale ends on December 31, 2010. All orders placed between Dec. 17 and Dec. 26 will be fulfilled after the Christmas holiday.

Posted in Diaper Covers | Leave a comment

2010 Online Shop Holiday Hours

Except for auto digital downloads, all shipping orders placed on Dec. 17-26 will be processed after the Christmas holidays.

Posted in Wabi Sabi Baby News | Leave a comment

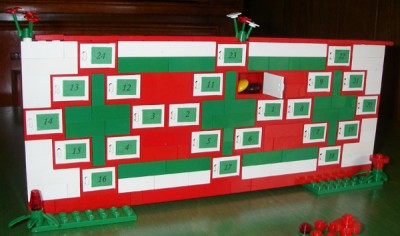
Advent Calendar Made Out of Legos

Here’s a super easy Advent calendar that your kids can make themselves and have fun doing it. Well, mine are still quite young so I helped them with the layout.
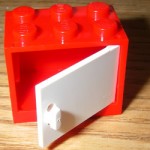
Lego stores are popping up everywhere and if you’re lucky enough to find yourself close to one, head back to the Pick A Brick wall and see if they have these 2 x 3 boxes and accompanying doors that just happen to be in Christmas red and white colors. The recently opened store in Austin at Barton Creek mall does! These boxes are just big enough to hold several pieces of jelly beans, reeses, or M&Ms. You can fit at least 24 of these drawers and doors in their small pick-a-brick containers with enough room left over for more pieces.
Posted in kids craft, toys | Leave a comment

My Favorite Pie Crust


Is a butter crust. I’ve tried them all – oil, shortening, butter, combo – for the fat portion of the crust and I simply prefer the taste and texture of an all-butter crust. At first, it seemed harder to work with but I’ve finally found my tried-and-true method. Of course, it involves my trusty KitchenAid stand mixer. For me, it’s much easier than using the food processor or doing it by hand with a pastry cutter. The key is to use super cold butter and icy water and to minimally handle the dough with your hands. I follow the technique detailed on eggbeater.typepad.com except I don’t freeze all my bowls and utensils. Her favorite pie crust recipe is here. I use the same ingredient but different proportions. My ideal flour to fat ratio is 1 ¼ cups flour to 1 stick of butter. Here is the full recipe:

Ingredients for one crust:

  • 1 ¼ cups all-purpose unbleached flour
  • 1 tbsp sugar
  • ¼ tsp salt
  • 1 stick of butter (equal to 4 oz or ½ cup)
  • icy cold water

Method:

  • In a cup with spout, fill with about ½ cup water and put in freezer.
  • Cube butter and freeze for about 5 minutes.
  • In stand mixer, combine flour, sugar, and salt.
  • Add cold, butter cubes and mix with flat beater attachment until butter is coarsely incorporated. It’s okay to still have small chunks of butter.
  • Slowly add icy water while keeping the mixer on, just until the dough comes together.
  • Using a flexible pastry scraper, transfer dough to a lightly floured surface.
  • Roll out with a lightly floured rolling pin to desired thickness, between 1/8 and 1/4 inches. I prefer the thinner crust. Use the rolling pin to aid in transferring the dough to the pie plate. You can use the dough right away or refrigerate for a few days or freeze for up to a month. To store, wrap in plastic wrap, using the plastic wrap to squeeze and flatten the dough into a disc. Try to minimally handle the dough with your hands as you want to keep the dough as cold as possible, yet pliable. It gets easier with practice!

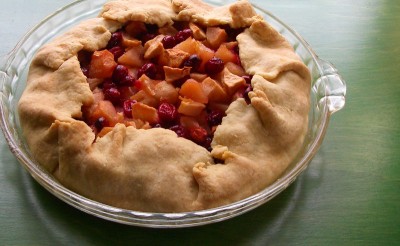
Pictured above is an apple, pear, and cranberry ‘rustic’ tart I made as a pre-Thanksgiving treat. The recipe and ‘rustic’ idea is from Simple Recipes. It’s such a gorgeous and tasty tart that I’ll be making again and again! To get the same look, I still baked my tart in a standard round pie plate as opposed to their more ‘rustic’ method and just folded the edges over. It was easier to keep the filling from spilling over as I formed the pie.

Posted in recipes | Leave a comment

Lunchbox Pizza Rolls


My son started kindergarten this Fall. I can see he’s already getting bored with the sandwiches I pack, no matter how much I vary the fillings. It’s hard for cold sandwiches to measure up to hot cafeteria food! I stumbled on one that he really likes – pizza rolls! Or calzones as some call them, I think. To follow up on the last post on my basic pizza dough recipe, I usually make enough dough and toppings to make these hearty lunchbox items the same time I make pizzas which is usually at least once a month. Here’s how I make the rolls so that it’s easy to reheat in the morning and packs/keeps well for several hours:

  • Roll out dough into an elongated rectangular-ish shape
  • Lightly brush dough with olive oil
  • Sprinkle first layer with shredded cheese
  • Add other toppings; my favorite combination is sausage, bell peppers, mushrooms, onions, olives, and one or two slices of tomatoes without the juicy seed part. Do not add sauce as it will make the rolls soggy but instead, pack the marinara (or ranch) sauce on the side for dipping.
  • Top off with another layer of cheese
  • Fold and seal, leaving a small opening around the center for steam to escape
  • Bake a few minutes longer as you would the pizzas, until the top crust is browning
  • Let cool, then wrap in foil
  • Keep refrigerated; the morning of, reheat in the microwave until very warm but not steaming hot and pack it in foil

And by the way, I created a new category – Lunchbox – for future blog posts like these.

Posted in lunchbox, recipes | 2 Responses

All-Purpose Pizza Dough


Here’s my basic dough recipe for making pizzas, calzone, or any stuffed rolls. On some weekends, we would have pizza night where I’d go to the trouble of making homemade pizza (totally worth it). And while I have the whole mess out, I usually make calzones or pizza rolls which make great lunch packs for the weekdays lending some variety to the regular old sandwiches.

Ingredients:

  • 4 cps bread flour
  • 1 tbsp salt
  • 2 tsps sugar
  • 1 tbsp yeast
  • 2 tbsps olive oil
  • 1 2⁄3 cups warm water

Directions:

  • Mix all dry ingredients, sugar and yeast last, in stand mixer with dough hook.
  • Add wet ingredients.
  • Knead for a minute. Rest about 5 minutes.
  • Knead for about 5 – 10 minutes until dough looks smooth.
  • Oil bowl and dough and cover with hot, damp towel. Let rest at least 1 ½ hours.
  • Preheat at 500° with pizza stone in oven for at least half hour before baking.
  • Dust a wooden board with flour.
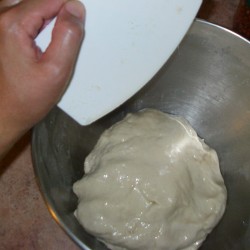
  • Use a plastic dough scraper (or equivalent) to break off a small chunk of dough.
  • Roll the dough out onto the flour dusted board. Or, stretch the dough with your hands, fingers, and gravity. There are so many ways to do this; experiment and use what’s easiest for you.
  • Generously dust pizza peel with flour and cornmeal. Assemble pizza and ingredients on top.
  • Slide on pizza stone and bake for about 10 minutes.

Pizza dough is very forgiving. It doesn’t have to rise for a full 1 &fract12; hours; it’s just a ballpark as temperature affects how quickly your dough will rise. You can also store the dough in the refrigerator to be used within a few days.

Also, if you feel the need to ‘proof’ yeast, then combine the sugar and yeast in a glass measuring cup. Add the warm water and wait about 5 minutes. If it’s bubbly, then add to the flour/salt mixture. But what I typically do is add the sugar and yeast last, on top and in the middle of the flour/salt mixture. Then, I pour the warm water over top and let sit for a minute. If it bubbles, then I add the oil and start mixing.

If using pizza sauce, brush crust with olive oil first and bake for about 5 minutes. I don’t do this as I like my pizzas thin and crispy but I usually serve the marinara or pizza sauce on the side. More details in a later post…

Posted in recipes | Leave a comment